Community Forum
The new layout is in beta testing and we're inviting you to help us try it out! Click here to read the announcement post for details.
Starting Out - A Step-by-Step Beginner Guide
-
Silverine

- Posts: 1795
- Joined: Wed May 17, 2017 3:13 am
- Visit My Farm
Starting Out - A Step-by-Step Beginner Guide
Silverine's Guides - Quick Links
Step-by-Step Beginner Guide - You are here.
Feeding For Weight And Temperament
Quest Breeding Guide
Discipline Potential Evaluation
Evaluating Stud Quality
Step-by-Step Beginner Guide - You are here.
Feeding For Weight And Temperament
Quest Breeding Guide
Discipline Potential Evaluation
Evaluating Stud Quality
Step-by-Step Beginner Guide
There are a lot of beginner guides out there, but I couldn't find one with a nice step-by-step as to what to do first, etc, so I thought I'd let you all know how I personally like to start out.Firstly let me say that is just how I do things and there are many valid ways to start out. This is all based on my opinion, and your opinion and experiences may vary. With that, let's get started!
Your First Horse
The first thing the tutorial will have you do is adopt your first mare from the Adoption Center (also known as the AC). For future reference, any horse that is adopted from the Adoption Center is generally referred to as an AC horse. Also notice that I emphasized that the tutorial wants you to adopt a mare. This means that if you adopt a stallion instead it will not count toward the tutorial goal. You may still adopt a stallion first if you want to, but it is better to wait until the tutorial prompts you to adopt one.When picking your first mare you have several breeds to choose from. The breeds available in the AC are known as Ancient Breeds, and are used to create all other breeds available in the game. Each breed has pros and cons, so just look for one that you like. EVEN IF A BREED DOES NOT EXCEL AT ANYTHING, IT CAN STILL HELP YOU START OUT. Don't be turned off of a breed just because it doesn't seem that great in my table. If you like the horse, go for it. Anyway, here is a brief introduction to the ancient breeds:
| Breed | Good Stats | Bad Stats | Excels At | Available Colors | Notes |
| Arabian | Stamina | Strength, Agility, Balance, Tempo | Endurance | Gray, Chestnut, Bay, Black | If you want to start with arabians I suggest using a different breed for the tutorial, avoiding the AC arabians, and waiting until you have enough money to pick one up from the player market. |
| Belgian | Strength | Speed, Stamina, Movement, Agility | Log Pull | Chestnut, Bay, Black | A good beginner breed. Bays and blacks are rare. |
| Caspian | Intelligence | Strength, Stamina, Movement, Tempo | Working Ranch | Chestnut, Bay, Brown, Black, Red Dun, Bay Dun, Brown Dun, Grullo | Not super beginner friendly. |
| Forest Horse | Movement | Speed, Stamina, Balance, Intelligence | Reining, Driven Dressage | Chestnut, Bay, Brown, Black, Red Dun, Bay Dun, Brown Dun, Grullo | Not a bad breed to start with. Blacks are very rare - even if it looks like a black, it's probably not. |
| North African Barb | Movement | Strength, Agility, Tempo, Intelligence | Hunter, Saddleseat | All colors except gray | The most colorful ancient breed, though not the most helpful for making money. |
| Przewalski Horse | Balance | Speed, Movement, Agility, Intelligence | Nothing | Bay Dun | Another not-so-helpful starting breed due to its sub-par stat spread. |
| Shetland Pony | Strength, Agility | Speed, Stamina, Movement, Balance, Tempo | In-Hand Jumping | All colors except pearl dilutes and gray. | The only AC breed short enough to compete in player-created In-Hand Jumping competitions. Not a bad starter breed, though may be difficult to use in the long term. |
| Tarpan | Tempo | Speed, Strength, Movement Agility | Nothing | Bay Dun | The tarpan has an unfortunate stat spread that makes it very bad at competitions without some very selective breeding. It's best to avoid this breed until you're more well-established. |
| Turkmene | Speed | Strength, Balance, Tempo, Agility | Racing | Chestnut, Bay, Brown, Black, Palomino, Buckskin, Smoky Brown, Smoky Black, Cremello, Perlino, Brown Cream, Smoky Cream | One of my personal favorite starter breeds, but can be difficult to keep as a long-term project. |
Naming Your Horse, Buying a Halter, Increasing Inventory Size, and Equipping the Halter
Following the next tutorial steps are quite easy. To name your horse you must first find it - do this by navigating to your farm page, clicking on your pasture, and then clicking on your horse. Under your horse's picture should be a box labelled "Edit Name" - click that, enter any name you like (or hit the "Random" button), and click save. Ta-da! You've named your first horse!Then you'll need to buy a halter. You can do that at the tack store. Halters will be almost all the way at the bottom of the page.
Pay attention to the price of the halter! At this point your supply of Pony Tokens (PT) is very limited, and you don't want to waste them on a halter - especially as 57PT (the price of the PT halters) is enough to buy you two horses from the AC. Stick with the halters that are being sold for plain old dollars. Pick one of the dollar halters that you like, click "Buy for $213" and you're good to go!
After buying the halter, increase your inventory size by going here and clicking the big blue button in the middle.
Once that's done, head back to your horse because we need to equip the halter. Doing this is actually rather simple. On your horse's page there is a bar to the left of its picture labelled "Attributes" at the very top. Follow this bar down, past the section labelled "Accomplishments", to a section labelled "Equipment". There will a green box labelled "Change Wearables". Click that green box.
Clicking the "Change Wearables" box will open up a new dialogue with a bunch of options. You can ignore most of them. Look for the icon that says "Halter" and click it. You should now see your newly purchased halter with a box next to it that says "Wear This". Click that box. Ta-da! You've just equipped your first wearable.
The First Training Session
The next thing the tutorial will want you to do is train your horse. Training your horse is a very important part of HWO, and getting started on the right foot is crucial!To help your horse be the best it can be you need to get the most out of its first training session. Right now you don't have any training skills so the amount of time and kinds of activities you can spend/do with your horse are very limited. The most beneficial thing you can do with your horse right now is to choose 10 min for the duration, then click "Change Activity" and choose Collection and Impulsion (the fifth option on the list). These two options will give you the most bang for your training buck at this point in time. DO NOT CHANGE TERRAIN OR GAIT.
Once you've chosen those two options click "Begin Training Session". You'll see your horse's energy drop as well as some of its stats going up. After the ten minute session your horse should still have enough energy left for another five minute session. So even though you're done with that part of the tutorial after the first ten minute session, switch your duration back to 5 min and click "Begin Training Session" one more time. This will ensure that your horse gets the most of its (and your) first turn on HWO.
The First Local Show
Now the tutorial will want you to enter a local competition. Local competitions are your easiest and most reliable form of income on HWO. And entering them is super easier!On your horse's page, below its picture and the row of buttons for selling, breeding, and rehoming, is a row of tabs. The first tab says "Info", the second says "Local Shows". Click the Local Shows tab. Once there you'll see a few options. The first is a drop-down to select which level you want to enter. STICK WITH LEVEL 1 FOR NOW. Entering higher level shows requires an entry fee and you don't yet know how well your horse is going to do in competitions, so stick with the free level 1 shows.
Note: Always avoid level 2 shows! There is NO REASON to enter a level 2 show. Best-case scenario you will make the same amount of money that you would with a level 1 show, worst case you will lose money (if your horse does not place 3rd or higher). So either stick with level 1, or jump straight to level 3 when you're ready to start moving up the levels.
Your next step is to choose what you want to show your horse in. Our wonderful admins have provided a list of what stats are judged in what shows. Consult the list, compare it to your horse, and decided which discipline you would like to show your horse in. Once that's decided find that discipline on the Local Shows tab (it will be under one of the four headings) and enter your horse in the level 1 show!
Analyzing Your Horse's Results and Determining Next Steps
Before we move on I'd like to talk about figuring out exactly how well your horse did in that show. The game will tell you what place your horse got, but that's not the only thing to think about. Remember that at this point your horse has almost no training. It also is likely not at a great weight or temperament for showing. Weight and temperament are complicated aspects of competing and something you should aim to familiarize yourself with eventually, but for now you should aim to keep your horse's weight at Moderate and its temperament as close to Even-Tempered as you can. I'll post a short guide for feeding and temperament at the end of this guide.
So if your horse got a first place finish in its first level 1 show, great! But if it didn't - don't fret! Any first, second, or third place finish is great. If you finished fourth or lower you need to re-evaluate your discipline choice. Look back at the discipline guide and your horse's stats and see if maybe you misread something and your horse would actually do better competing in a different area.
If your horse placed 1st: You can consider moving up to level 3 shows for a higher chance of earning bonus rewards (PT or extra turns).
If your horse placed 2nd: You can also consider moving up at this point, but it's best to hang out at level 1 shows until your horse is placing 1st consistently.
If your horse placed 3rd: Stick with level 1 shows for now. Wait until you are consistently placing 1st to move up. It's also very possible your horse will do better in a different discipline. Consider checking the discipline chart again.
A Strategy for Quick Gains
If you want to avoid the complicated choosing of disciplines and analyzing results, there's a fairly simple workaround - enter your horse in level 5 In-Hand Jumping.
Placings for local shows are based on scores generated in player-hosted competitions. There aren't a lot of horses around competing in In-Hand Jumping (mostly because the player-hosted shows are height restricted), so the scores there aren't as high as the scores in more common competitions. Because of that it is easier to place well in the In-Hand Jumping local shows.
This is a fairly easy way to earn money, PT, and turns, but won't help you evaluate your horse to determine its strengths and weaknesses in the show arena.
Basic Horse Management
Your next step is to increase how many horses you can own. To do that, go to the Horse Ownership section of the Player Courses and "Begin Course" under Basic Horse Management. The course should be done after several seconds, at which point you can click "Complete Course" and voila! You now have space for two horses.The tutorial will need you to complete the course at least twice so that you have space for three horses. While you're at it you may as well complete the course as many times as the game will let you (five), giving you space for a whopping six horses.
Note: Starting these courses requires money. You should have enough starting money to complete all of the basic horse management courses. However, if you're worried about saving money you can get by with only completing the two sections of the course required by the tutorial.
Your Second Horse and Breeding Your Mare
Next the game will want you to adopt a stallion from the AC. The advice from adopting your first horse still applies here. Find one you like and adopt him. Though the game wants you to buy this stallion for breeding purposes you do not need to use this specific stallion to complete the breeding quest. So don't worry if he's not a good match for your mare.Now the game will want you to breed your mare. The easiest way to do this is to use the stallion you just adopted, but you are also welcome to browse stallions at stud. These stallions were put up for stud by other players and are usually higher quality than the AC horses, though some of them will have very expensive stud fees. Also note - a high stud fee does not mean you will get a better foal. All it means is that the player that owns the stallion wants more money from people breeding to said stallion (which can be for a variety of reasons, not all relating to quality). I'll post a short guide regarding stallion quality at the end of this guide.
Once you've decided on the stallion that you want to breed your mare to click "Breed Horse" on the stallion's page (there's a button just below his notes section) and then click "Breed With This Horse" underneath your mare in the dialogue that pops up. (If you want to breed your mare with the stallion you adopted you can also accomplish the breeding from her page. But if the stallion is owned by another player you will always have to breed from the stallion's page.)
Ta-da! Your mare is bred, and you can expect a foal in 22 to 26 turns. (Or 11 to 13 months.)
Taking Your First Turn
In order to continue advancing in the game you will need to take turns. This is done by clicking the moon icon in the top right. BUT DO NOT ADVANCE THE DAY YET! There are still some things to do before you move on!Using Up Your Time
You have a bunch of time left on your first day! Each turn you can train and enter local shows until your time reads 10:00 pm. If you've trained only one horse and entered only one show your time should still show as 11am or earlier. Use the rest of the time to train any new horses you've picked up and enter as many local shows as you can. The game will let you know when you are out of time for the day.
Local shows are the best use of your time! Each local show takes 3 hours of game time. Without training your horses you should be able to enter five local shows per day. If you have stuck with the two horses the tutorial had you adopt you will be able to train both horses as much as you can each day and still enter four of those five shows. Training those horses will let you enter higher level local shows and have a better chance to earn more turns and PT. However, if you have more than those two horses I would suggest picking only two to focus on training and using the rest of your time to enter local shows. The more local shows you enter, the more money, PT, and turns you will earn!
Feeding Your Horses
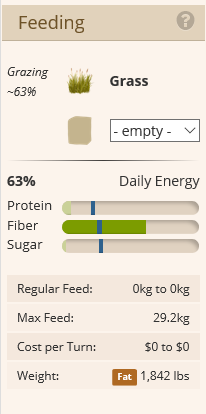
Now that your time is used up, let's first make sure your horses will be fed when you take your turn. To do this, navigate to your horse's page and scroll down to the "Feeding" section - it will be found under the "Equipment" section from the halter step. Right now your horses should be in pasture and their feeding box should look something like this:
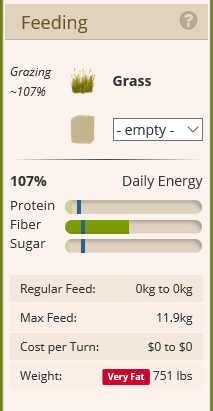
Some horses will maintain or even gain weight on only pasture! Consider this feeding box:
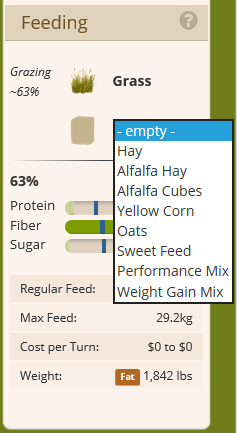
For now you want to make sure your horses will have enough energy to train on your next turn. So if you horse is like the second one above you can just leave it as-is, but if your horse has a feeding box like the first and is not getting 100% or more energy from grass you will need to supplement its feeding with grain or hay. If you click on the little drop-down arrow under where the box says Grass you will be given a list of options to choose from:
Once you have used up all of your time and made sure that your horses are fed you are ready to take your turn! Click on the moon icon, click "OK" and watch as the day changes over!
Your Second Day
When the date rolls over you will see a box like this:

The box also lets you know how much you paid to feed your horses. Having more horses means you will spend more money to feed them, so it's a good idea to keep your herd small at the beginning. (Side note: if your horses are the type that stay energized on grass alone you won't spend anything to feed them. You'll only be charged if you're feeding them something other than grass.) Luckily the local shows you should be entering will earn you more than enough money to feed your horses at this point.
And finally this box is where you will be notified if any of your horses does something interesting - if it has a foal, reaches breeding age (4 for mares, 3 for stallions), if its not eating enough, or if it dies. Make sure to keep an eye on this box to know what's going on on your farm!
Note: Horses on HWO only die from old age. You can not kill your horse by over-feeding, under-feeding, or over-working.
For your second day continue to train and show your horses like you did on your first day, make sure they're still eating enough, and advance your day again.
Where To Go From Here
At this point you have a pretty good idea of the general flow of life on HWO. As you continue to play you will gain player levels and skills that make life much easier. For now keep familiarizing yourself with your farm and your horses, introduce yourself to the community on the forums, and just have fun! And don't be afraid to ask questions! HWO has a wonderful community that is always willing to lend a helping hand to any that need it.Also check out my other guides, linked at the top of this post!
Last edited by Silverine on Wed Jan 29, 2020 3:00 am, edited 1 time in total.

Silverine's Guides - Quick Links
Step-by-Step Beginner Guide
Feeding For Weight And Temperament
Quest Breeding Guide
Discipline Potential Evaluation
Evaluating Stud Quality